Redux Toolkit 使用指南
Redux Toolkit 使用指南
官方地址:Getting Started | Redux Toolkit (redux-toolkit.js.org)
01 前言
Redux Toolkit 简化了 Redux 的使用
使用过 Redux 的小伙伴无法避开的痛:
- 在真正使用 Redux 之前,需要配置一系列的 Action 、Reduce,显得非常繁琐
- 需要添加很多包才能让 Redux 做任何有用的事情
- …
02 最佳实践
安装相关依赖
1 | |
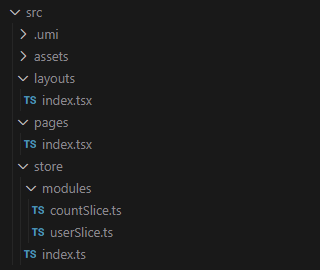
使用 Redux Toolkit 库目录结构,可参考下:
创建 store
1
2
3
4
5
6
7
8
9
10
11
12// store/index.js
import { configureStore } from '@reduxjs/toolkit'
import countReducers from './modules/countSlice'
import userReducers from './modules/userSlice'
export const store = configureStore()
// 暴露 State 声明类型
export type RootState = ReturnType<typeof store.getState>
// 暴露 dispatch 声明类型
export type AppDispatch = typeof store.dispatch通过 react-redux 连接 React 应用
1
2
3
4
5
6
7
8
9
10
11
12
// layout/index.tsx
import { Outlet } from 'umi'
import { store } from '@/store'
import { Provider } from 'react-redux'
export default function Layout() {
return (
<Provider store={store}>
<Outlet />
</Provider>
)
}创建 slice( action 和 reducer )
使用 createSlice 创建一个 slice,我们可以导出生成的 action 和 reducer 函数。
关键参数:
name
命名空间,避免了 action type 同名的情况,生成 type 默认为 name/reducer
initialState
初始化状态值
reducers
根据业务编写 reducer,内置了 Immer 库和 thunk 库,不再需要返回一个新的 state 以及可以可以直接处理异步的 action。
countSlice 模块
1
2
3
4
5
6
7
8
9
10
11
12
13
14
15
16
17
18
19
20
21
22
23
24
25
26
27
28
29
30
31
32
33
34
35
36
37
38
39
40
41// store/modules/countSlice.tsx
import { createSlice, createAsyncThunk } from '@reduxjs/toolkit'
import type { PayloadAction } from '@reduxjs/toolkit'
export interface CountState {
value: number
}
const initialState: CountState = {
value: 0,
}
export const countSlice = createSlice({
name: 'count',
initialState,
reducers: {
increment: (state: any) => {
state.value += 1
},
decrement: (state: any) => {
state.value -= 1
},
},
extraReducers: (builder) => {
builder.addCase(incrementByAsync.fulfilled, (state, action) => {
state.value += action.payload
})
},
})
export const incrementByAsync = createAsyncThunk(
'count/incrementByAsync',
async (amount: number) => {
await new Promise((resolve) => setTimeout(resolve, 1000))
return amount
}
)
export const { increment, decrement } = countSlice.actions
export default countSlice.reducer将上一步创建好的 Reducer 注入到 store
1
2
3
4
5
6
7
8
9
10
11
12
13
14
15// store/index.js
import { configureStore } from '@reduxjs/toolkit'
import countReducers from './modules/countSlice'
import userReducers from './modules/userSlice'
export const store = configureStore({
reducer: {
count: countReducers,
user: userReducers,
},
})
export type RootState = ReturnType<typeof store.getState>
export type AppDispatch = typeof store.dispatch投入页面使用
1
2
3
4
5
6
7
8
9
10
11
12
13
14
15
16
17
18
19
20
21
22
23
24
25
26
27
28
29
30
31
32
33
34
35
36
37
38
39
40
41
42
43
44
45
46
47
48
49
50
51
52
53
54
55import type { RootState } from '@/store'
import { useSelector, useDispatch } from 'react-redux'
import {
increment,
decrement,
incrementByAsync,
} from '@/store/modules/countSlice'
import { addUser, removeUser } from '@/store/modules/userSlice'
export default function HomePage() {
const count = useSelector((state: RootState) => state.count.value)
const users = useSelector((state: RootState) => state.user.userList)
const dispatch = useDispatch()
return (
<div>
<div className="count">
<div>{`日入斗金:${count}`}</div>
<button
aria-label="Increment value"
onClick={() => dispatch(increment())}
>
Increment
</button>
<button
aria-label="Decrement value"
onClick={() => dispatch(decrement())}
>
Decrement
</button>
<button
aria-label="AsyncIncrement value"
onClick={() => dispatch(incrementByAsync(1))}
>
AsyncIncrement
</button>
</div>
<div className="user">
<div>{`用户列表:${users.join(',')}`}</div>
<button
aria-label="AsyncIncrement value"
onClick={() => dispatch(addUser('张三'))}
>
addUser
</button>
<button
aria-label="AsyncIncrement value"
onClick={() => dispatch(removeUser())}
>
removeUser
</button>
</div>
</div>
)
}
效果图:

总结:使用后,会发现 Redux Toolkit 的目标是帮助简化常见的 Redux 用例,帮我们简化了一些样板代码,并不意味这 Redux 不好,Redux 灵活性和扩展性更好,只是在常见项目开发中,我们更需要的是达到那种开箱即用状态,也会是 Redux Toolkit 。
03 Immer 库
Immer 简化了对不可变数据结构的处理
怎么理解,举一栗子🌰
正常来说,JavaScript 中常见数组和对象结构,当我们更新它内部的值的时候,它们的内存地址是没有发生改变的
1 | |
但是,我们希望它在更改内部值的时候,在其他的值不发生(内存地址不改变),且它的根对象或者数组和改变地方的内存地址发生改变。
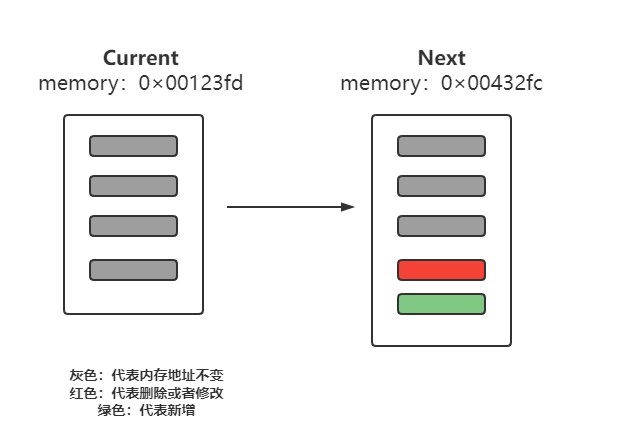
Current 的内存地址发生改变(Current !== Next )
话不多说,show my code!
1 | |
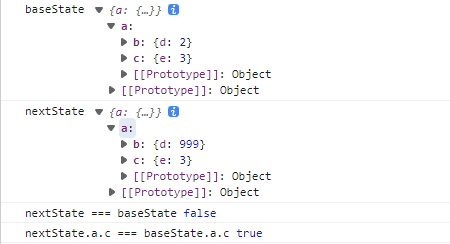
不难看出,为了实现上述“需求”,数据结构越复杂,嵌套地越多,我们需要浅克隆地方就越多,太繁琐了。
于是,immer 库诞生,就帮我们解决这繁琐地浅克隆
1 | |
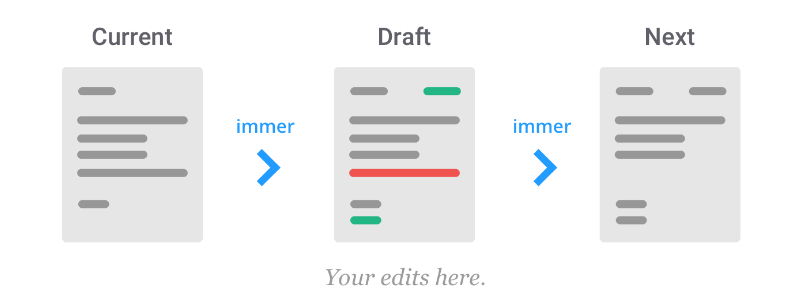
工作原理:基本思想是,使用 Immer,您会将所有更改应用到临时草稿,它是currentState的代理。一旦你完成了所有的改变,Immer 将根据对草案状态的改变生成nextState 。这意味着您可以通过简单地修改数据来与数据交互,同时保留不可变数据的所有好处。
至此,小伙伴对 immer 应该有了初步清晰地认识,会有疑问,为什么 Redux Toolkit 需要内置 immer?
使用过 Redux , react-redux 小伙伴,应该有所感触,因为 React 是单向数据流 ,当数据发生改变时,数据的内存地址没有发生改变的话,是不会引起 React UI 视图层的更新的。
1 | |
如下图所示,数据一发生改变,但是 UI 层页面并没有发生改变。
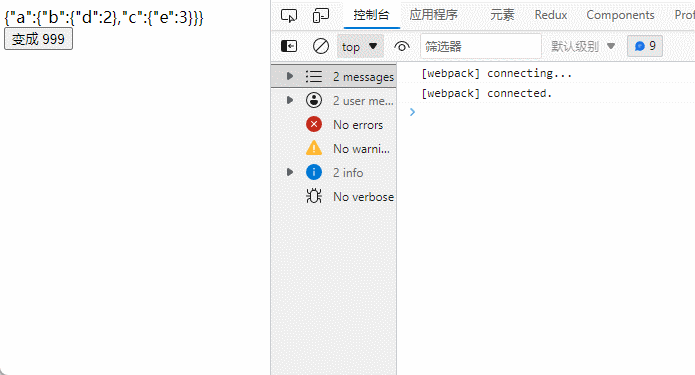
所以为了让数组或者对象的内存地址改变,只能通过克隆方式改变,所以 Redux 作为状态管理,只负责维系状态,所以要想 UI 层发生改变,只能改变起内存地址(克隆)。深克隆会引起一定性能消耗,只能使用浅克隆。
**所以内置 Immer **
- 极大地简化了不可变的更新逻辑,让代码实际意图更加明显
- 正确编写不可变更新很难,对象和数组嵌套越多,而且很容易出错。Immer 有效地消除了意外改变。
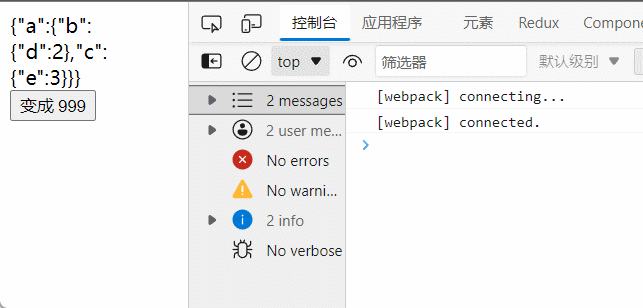
使用 immer 改造下上述案例
1 | |
发现很轻松就实现了!!!😊
本博客所有文章除特别声明外,均采用 CC BY-SA 4.0 协议 ,转载请注明出处!