听说你还不会“虚拟列表”,对不起我来晚了

听说你还不会“虚拟列表”,对不起我来晚了

前言:上次说到要实践 React- window , 今天终于可以过来还债辽😀!研究了许久,总共想到 3 种方法实现它。

01 什么是虚拟列表❓

它是当下解决长列表数据(2w数据量)高性能解决方案,它的原理也非常通俗易懂,正常情况下,2w数据或者更多数据要渲染到列表是非常耗时,且滚动起来非常卡的,总而言之用户体验非常差的。而虚拟列表,只需要渲染可视区域数据,它极大减少渲染性能的开销,提升了用户的体验。

image.png

02 实践起来💻

这边为了方便没有学过框架的小伙伴,我用原生的Html来编写,同时上传到了在线编辑IDE里面,可供大家参考

a. Position 法:

  • 首先,我们需要定义几个变量

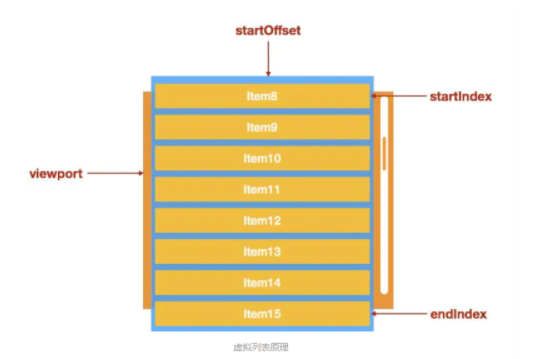
    • startIndex: 用户可视区域的第一个数据项,参考上图就是 item8

    • endIndex: 用户可视区域的最后一个数据项,上图的 item15

我们只对可视层做渲染,但是为了保持整个容器像渲染正常长列表一样,里面的容器还需要保持原有的高度。这边把 Html 设计这样

1
2
3
4
5
6
7
8
9
10
11
<!-- 外层容器 -->
<div className="vListContainer">
<!-- 内层容器 -->
<div className="phantomContent">
...
<!-- item-1 -->
<!-- item-2 -->
<!-- item-3 -->
....
</div>
</div>
  • 其中,vListContainer 容器样式为overflow-y: auto;(出现滚动条)

    • phantomContent 容器样式为position: relative

    • 内容器里面子项 item-n 样式为 position: absolute

    • 设计这样,就是为了方便通过相对定位的方式,把 item-n 渲染到可视区域去(灵魂👌)

  • 接下来,我们需要在 vListContainer 绑定 onScroll 函数,利用其 scrollTop 计算出 startIndexendIndex

    计算之前,需要知道:

    • rowHeight :单项数据的高度
    • total: 总共数据量
    • height:可视的高度,通过 vListContainerclientHeight 可以拿到
  • 通过上述变量就可以计算出 :

    • 列表总高度: phantomHeight = total * rowHeight 设置内层容器 phantomContent 高度
    • 可视范围内展示元素数:limit = Math.ceil(height/rowHeight)
1
2
3
4
5
6
7
8
9
10
11
12
function onScroll() {
/* 求得 startIndex,endtIndex */
const { scrollTop } = vListContainer;
const currentStartIndex = Math.ceil(scrollTop / rowHeight);

if (currentStartIndex !== startIndex) {
startIndex = currentStartIndex;
endtIndex = Math.min(currentStartIndex + limit, total);
}
// startIndex,endtIndex 更新后,渲染到可视区域
renderDisplayContent();
}
  • 得到这些参数,我们就可以把数据项渲染到可视区域去辽😊
1
2
3
4
5
6
7
8
9
10
11
12
13
14
function renderDisplayContent() {
phantomContent.innerHTML = "";
for (let i = startIndex; i <= endtIndex; i++) {
// 遍历数据项,并渲染到 DOM 上
var x = document.createElement("DIV");
x.style.border = "1px solid #eee";
x.style.width = "100%";
x.style.position = "absolute";
// 这块关键代码,通过绝对定位,像钉子一样钉在可视区域
x.style.top = i * rowHeight + "px";
x.innerText = i;
phantomContent.appendChild(x);
}
}

然后就会得到一个简单高性能的列表 —> 效果图💕

高性能长列表效果图.gif

结论:通过效果图,可以很清晰看到,DOM做到真正可渲染可视区的数据项,从 2w –> 20 ,性能可谓是翻了很多倍呢😉。这边只是实现一个简单造轮子,建议大家一定要动手,能更快上手。另外 React-windowreact-virtualized 是社区封装好的,当然,有现成是方便我们使用,但是一定动手,知识才是属于我们嘚!😎

线上Demo: new-snowflake-bo42ol - CodeSandbox

优化:现在渲染的是只是简单数据项,真正应用场景,可能有图片,各种文字,渲染起来可能会有卡顿。引入 BufferSize概念,类似缓冲区一样的。

优化后的Demo:cocky-montalcini-762v0x - CodeSandbox

剩下两个方案,都和上面差不多,只是实现方式不一样。不做过多解释,举一反三。线上Demo 有标注关键代码部分

b. transform 法

关键思想: 利用 transform y属性,去造成那种划动的效果

1
2
3
4
5
6
7
8
9
10
11
12
function renderDisplayContent() {
//------ 关键代码部分
phantomContent.style.transform = `translate3d(0px,${startIndex * rowHeight}px,0px)`
//------
phantomContent.innerHTML = ""
for(let i = startIndex; i <= endtIndex; i++ ){
var x = document.createElement("DIV");
x.style.border = "1px solid #eee"
x.innerText = i
phantomContent.appendChild(x)
}
}

线上Demo:distracted-snowflake-v3400l - CodeSandbox

c. marginTop 和 marginBottom 法

关键思想: marginTopmarginBottom 去分别填充,可视区域的 上面下面。(有兴趣可以试试 pandingToppandingBottom

1
2
3
4
5
6
7
8
9
10
11
12
13
14
function renderDisplayContent() {
//------关键代码部分
phantomContent.style.marginTop = rowHeight * startIndex + "px";
//------
phantomContent.style.marginBottom =
rowHeight * (total - endtIndex) + "px";
phantomContent.innerHTML = "";
for (let i = startIndex; i <= endtIndex; i++) {
var x = document.createElement("DIV");
x.style.border = "1px solid #eee";
x.innerText = i;
phantomContent.appendChild(x);
}
}

线上Demo : hardcore-newton-phulu8 - CodeSandbox


本博客所有文章除特别声明外,均采用 CC BY-SA 4.0 协议 ,转载请注明出处!